Handling Unsubscribes
Handling Unsubscribes
In this article:
Why manually mark a lead as Do Not Contact?
How to mark a lead as Do Not Contact?
- Via Exclude list
- Individually / Manually
- In bulk
Why Mark a Lead as Do Not Contact?
When a lead clicks an unsubscribe link in your email, QuickMail automatically marks the journey as unsubscribed and adds the lead to the Do Not Contact list. Leads on the Do Not Contact list cannot be added to any campaign.
Pro tip: To learn how to add an unsubscribe link to your emails, check out this article.
There are cases where you may need to do this manually, such as:
Your emails do not have an unsubscribe link.
A lead replied with the word "unsubscribe" instead of clicking the link. Only unsubscribe link clicks are supported at the moment.
The lead unsubscribed from a different platform and you need to reflect that in QuickMail.
You have a master list of unsubscribed leads and want to add them to QuickMail.
How to Mark a Lead as Do Not Contact?
Leads can be marked as Do Not Contact individually or in bulk.
Option 1 - Adding email addresses, domains, or LinkedIn profile IDs to the Exclude List
Go to the List page → Ellipsis → Exclude
After that go to either the Domain tab, Email Address tab, or LinkedIn tab and then click + Add at the upper right hand corner.
Option 2 - Individually/Manually
Go to the List page → search for the lead → select the lead → Actions → Mark as Do Not Contact.
You can also mark a lead as Do Not Contact from their quick view. To open it, click the preview button next to the lead's email address or click their thumbnail.
From the quick view, click the menu icon (three vertical dots) in the top-right corner → Do Not Contact.
Pro tip: The quick view is accessible from any page where leads appear, including the List page, Campaign Journeys, Sent Emails, and Tasks.
Option 3 - In Bulk via Import
To bulk mark leads as Do Not Contact, you first need to tag them so they can be filtered.
Step 1. Create a tag by going to List → Tags → Create New Tag.
Name the tag and save it. "DoNotContact" is just an example — you can name it anything.
Note: Tag names can only contain letters, numbers, hyphens (-), and underscores (_). Names with spaces cannot be created.
Step 2. Update your CSV by adding a column for Do Not Contact and entering "x" for every lead that should be marked.
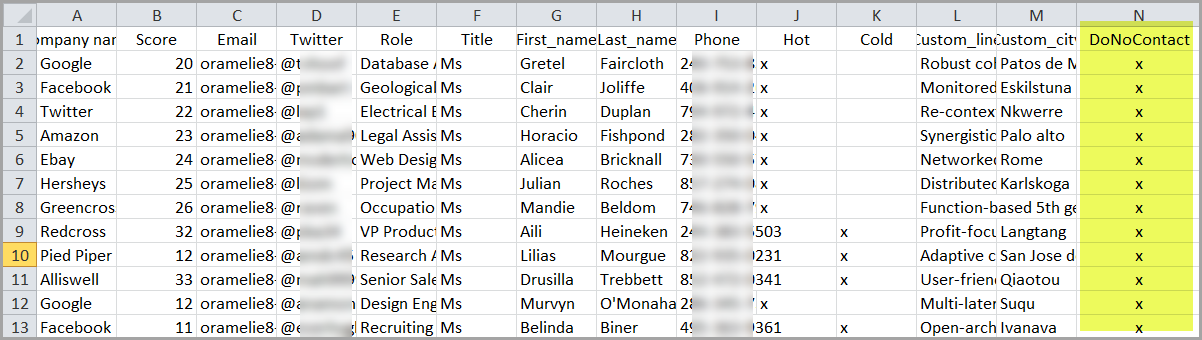
Step 3. Import the updated CSV into QuickMail. Before clicking Import, make sure to map the DoNotContact column to the corresponding tag in QuickMail.
If you'd like to know more about using tags, check out this article: https://help.quickmail.com/leads/segmenting-leads-with-tags/
Note: If the leads already exist in QuickMail, make sure to check Update lead if it exists. Without this, existing leads will be rejected to prevent duplicates.
Step 4. Once the import is complete, filter leads by the DoNotContact tag. Go to the List page → Advanced Filter → Tags → under Has ANY of the following tags, select DoNotContact → Apply Filter.
Step 5. Select all filtered leads → Actions → Mark as Do Not Contact.
:
Pro tip: You can also mark an entire domain as Do Not Contact by adding it to the DNC domain list.